Adset Canvas App
The Adset Canvas App in MarketPlan allows you to plan, create, and optimize high converting ad campaigns as well as measure the performance of each ad to help you scale your most profitable ads and cut out what is not performing for your campaigns.
5 Key Components
Now there are 5 key components of what goes into the process of running successful ad campaigns:
1. Firstly, write targeted ad copy,
2. With that copy, design eye-catching creatives,
3. Then, budget your campaign with a clear goal,
4. Also, create and manage your ads' links,
5. And, lastly, measure conversions and optimize your advertising strategies.
Normally, this process turns into a mess of applications and stats data (and more staffing than desired) to get real results.
Jumping between dashboards of stats and various ad platform portals just to get an idea of what is actually going on with your or your client's ad-spend can turn into an embarrassing headache.
So, with MarketPlan's Adset Canvas App, we bring simplicity and clarity to this process by giving a single place for you and your clients to visualize your ad campaigns as they are under production as well as provide detailed, real-time analytics, of your ads.
Let's jump inside of MarketPlan and see how this works.
Getting Started
So in this plan we have a cold traffic strategy that's pushing prospects through a squeeze page down over to a multi-offer funnel.
Let's go ahead and add in a fresh ad set canvas app so we can go ahead and see how this tool works when you first go inside.
You'll see here at the top the ability to title your ad and also you have the option to choose the ad platform here from this drop down.
We give you the ability to also choose a custom icon and color for alternate ad platforms.
Here you also can enter your ad set's goal to keep the entire team in focus
about what campaigns' are being ran down below.
In the ad set canvas app you have the ability to click and drag in ads here from the left so that you can map and organize your ad campaigns in a
way that your team or your clients can understand as well as giving the opportunity to collaborate on each individual ad
involved in the campaign.
Now let's go ahead and jump inside of a pre-populated ad set canvas app that we have built.
As you can see we have this one set up for Facebook for a solution aware
audience and here at the top right you'll see the ad set goal for this
campaign is to drive solution aware traffic to our lead magnet.
This ensures while the team is collaborating on each of these
ads and producing the necessary assets, everyone is able to stay focused on the intentional goal that we have so that we can maintain our add strategy and marketing congruency throughout each of the components behind the advertising process.
As your team is actively collaborating, each ad that you have on the mini canvas has its own task area at the right for its own dedicated tasks,
allowing further organization for delegation.
Let's go ahead and drag in an alternate image ad for this campaign as
you'll see the task area at the right is blank and ready for us to populate tasks.
For our whole team let's go ahead and fill some in.
Writing Targeted Copy
Now let's go into the first component of running a successful ad campaign which is writing targeted ad copy.
Our little mock-up theme that we have over here is selling in-season summer fruit from local farmers.
Now let's go ahead and prepare some copy for our audience that's aware of the type of solutions we provide.
Okay great. As we move on production you can click the settings at the top right and you'll see a few more fields for us to work with.
This is designed to help with the productivity of your marketing
assets.
Firstly you have the actual ad URL field, which gives us the ability to put in the ad URL of our ads manager.
In this Facebook example we can go ahead and go directly within our campaign to where the actual ad is.
Now this is a different ad I already have created and we can simply grab the URL and copy it from our browser window and
paste it directly in here.
When we click "Done" that's saved so that whenever we click "View Ad" at the top left we can simply open up another tab and directly access our ad with one simple click, giving your team or your clients an easy
way to access the actual ad itself if any modifications need to be made
as well as providing a layer of organization.
In the settings here we also have the projected budget which
we'll go over in just a bit, and we have the media URL for the actual ad
asset as well as the tracking link for the links which we'll also talk about
here in a bit.
But let's focus on the media URL which brings us into the
second component of successful ad campaigns which is design
great high converting creatives that match the copy that we've already
produced.
Produce Creative Elements
Our team has already picked out a stock image for this ad so we're simply
pasting the URL of that image here and once we click done the ad now shows the image directly within the mini canvas area.
Seeing all your ads together like this gives a very simple way of knowing
what's going on with the advertising strategy.
So let's go ahead and complete those tasks and move on to the third
component which is budgeting your ad campaigns with MarketPlan.
Campaign Budgeting
We give you powerful budgeting tools so that you can project the performance of your entire campaign.
From the perspective of these ads, let's go back into the settings
and enter in a projected budget and we give you two simple options to project a budget.
You can either enter in a simple flat rate if you know that you're going to
be working with a fixed budget for each of these ads or you can enter a CPC value so you can run more dynamic projections.
Let's go ahead and set a $2 CPC for this campaign and you'll see the
total budget here at the bottom left has updated accordingly.
If we exit the Adset Canvas App we'll see with the projected 250 visitors between each of those ads now affects our final projection down the entire line.
When we click the stats area you can see these numbers at a glance.
For more information about how projections work, inside of
this playlist we have a deeper breakdown of projections in MarketPlan with
everything created and projected.
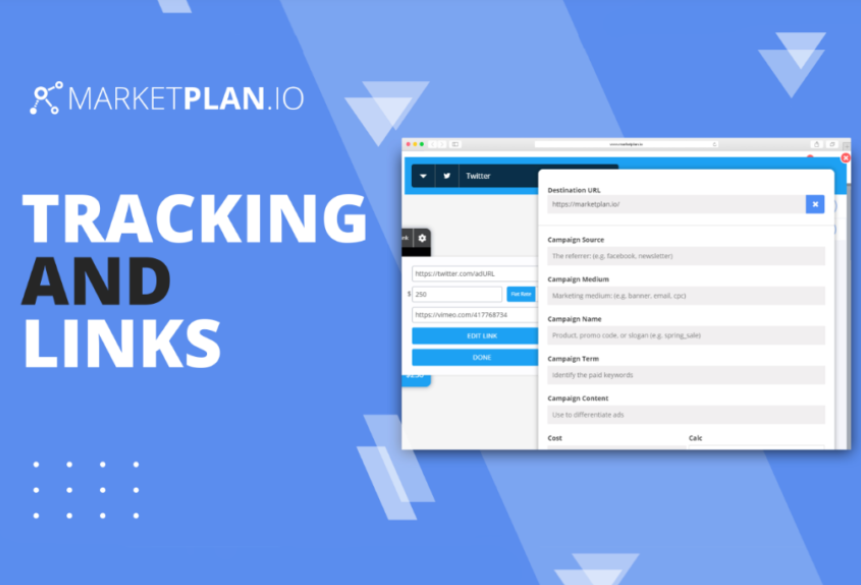
Let's focus on the fourth component of running successful ad campaigns which is creating and managing your ads links.
Link Management
With the edit link area here at the right you're able to quickly produce a
UTM link for proper ad differentiation and tracking.
We also have a video inside this playlist breaking down how to use
the link tool feature inside a MarketPlan.
Let's go ahead and go to an ad where we already have a link created.
As you can see we have all of our proper UTM parameters filled in.
When you have the link saved here at the top of each ad you have the copy link option which is a very fast way for your team to access that UTM link with one click to copy it to your clipboard.
Now when I need to enter into my ads manager I can simply access and
update the link very quickly.
All these productivity features give you a quick way to stay organized as you produce each component of your ads.
Now let's talk about the last component which is the tracking and
optimization of your advertising strategies.
Tracking & Optimization
Here at the bottom the link areas you'll see the ability for us to enter in expense values for these links.
When it comes to the live mode tracking of the campaign, these numbers are different from the budgeting numbers, as your team may be continually testing out different projection strategies.
So right here you want to enter the actual expense of the ad.
When it comes to the calculation of the traffic coming through, we also go over this in detail within the link video but we'll quickly cover the concept here.
You have the option to either enter in a fixed value for the expense of this ad, let's say if we were just only spending 750 for this one particular ad, or if we intend on running this ad for a longer period of time we could have the expense set for a monthly budget or even a daily budget as the live mode tracking is running for all your prospects coming down the line, and with MarketPlan we can apply those expenses for a particular date range so we can see these numbers in effect.
To calculate proper ROI you can either choose a custom date or let MarketPlan calculate it based upon the traffic coming in for this
particular link.
Now let's go ahead and back out to the canvas so we can see some of these numbers in action by flipping to live mode within this mock campaign.
We've had some synthetic traffic go through this so that we can see some numbers that we can make some actionable decisions from when we open up our live mode stats.
We're able to see with the visitors that have come through this campaign.
We're running $2,500 in the green and we can see each of the ads that we need to optimize.
If we go over to the solution aware ad we can see how the prospects that came through these particular ads flowed through the campaign and we can see that these visitors prefer the lesser price product inside of this campaign.
When comparing the two ads that we had traffic coming through we can see the video ad had a much higher ROI than the image ads.
Very quickly you could determine which ads are performing and which ones are underperforming so you know which ads to cut out and which ads to boost and scale.
Seeing this the simple decision would be to cut out image ads and to focus on creating video content.
So you can see how the MarketPlan Adset Canvas App allows your team or clients to work directly in relation to the big picture of your marketing campaign so that everyone can understand what's going on and so that you can optimize your ads for effective high-converting campaigns.
Learn more on Youtube here.